This is the eighth in a series of articles on celestial navigation. It answers a key question: when should you take your celestial observations and which stars should you choose?
To observe stars or planets, it must be bright enough to see the horizon, but dark enough to see the stars. Otherwise, it is impossible to measure an altitude. Observations should therefore be made at dawn (before sunrise) or at dusk (after sunset).
A good astronomical observation plan will specify the time of twilight, the observation period, and determine which stars to use for the observation. Ideally, it will identify three stars, with each pair having an angle of approximately 60°.
An astronomical observation plan is usually drawn up once or twice during a long voyage, as the stars identified for a particular journey are generally the same ones that will be used. With experience and practice, one eventually learns where to look.
Below, we will look at two useful methods for planning. The first method uses Volume 1 of the Ho 249 reduction tables. It allows you to select the stars and gives a general idea of their altitude and azimuth (direction).
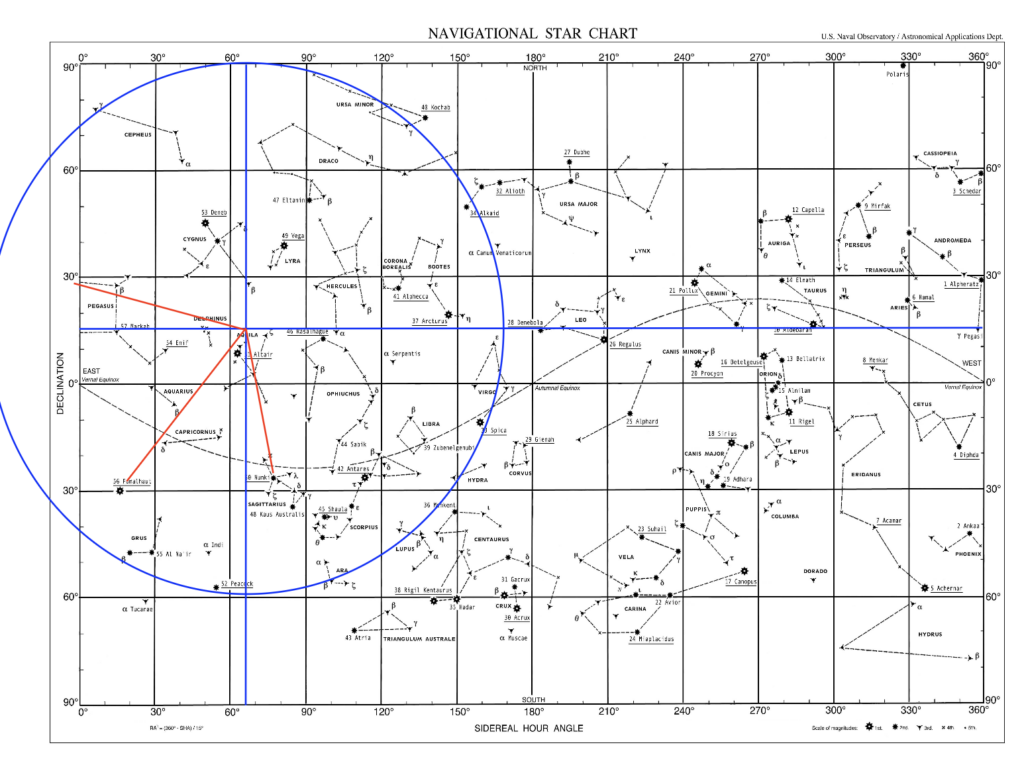
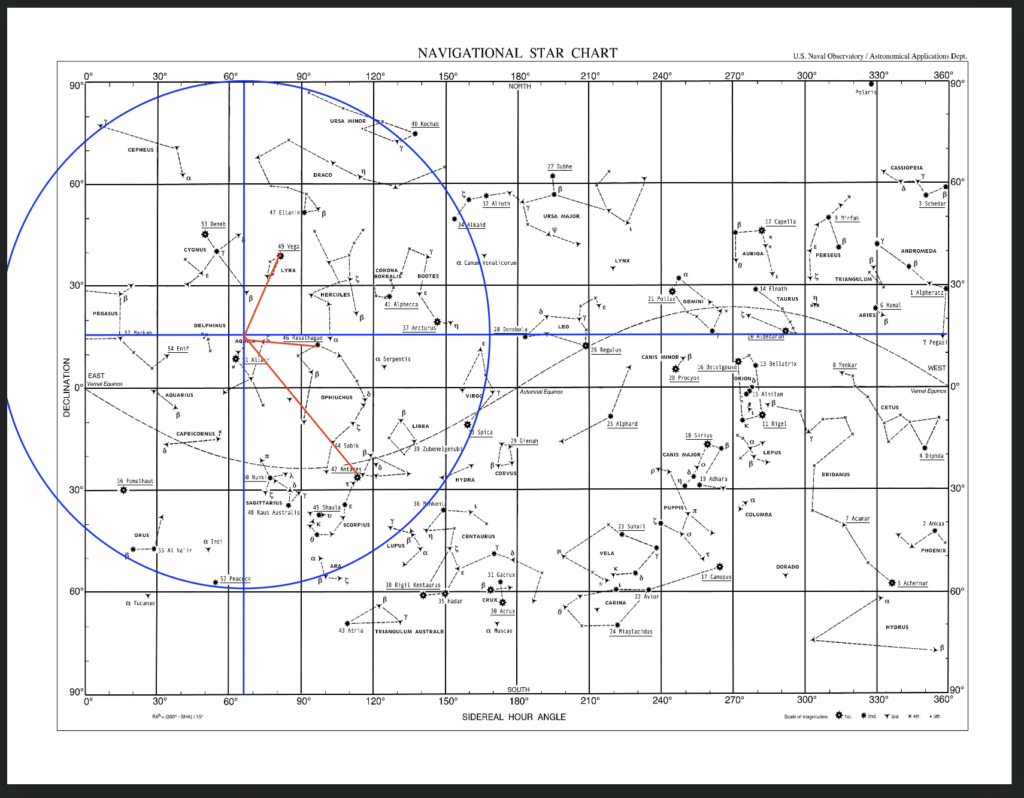
The second method uses a star chart (as in the image above). It only provides the azimuth of the stars, but the chart offers more visual reference points. This makes it easy to identify the selected stars, or to spot any errors in selection.
Before illustrating these features, we will first discuss how to identify the ideal time for observations: at dusk or at dawn.
Planning the observation period at twilight
A good rule of thumb for making astronomical observations is to start twenty minutes before nautical twilight, i.e. when the sun is between 6° and 12° below the horizon. This is the ideal time for making astronomical observations. In practice, you start your observations twenty minutes before nautical twilight, and you can extend your observations up to 20 minutes after twilight.
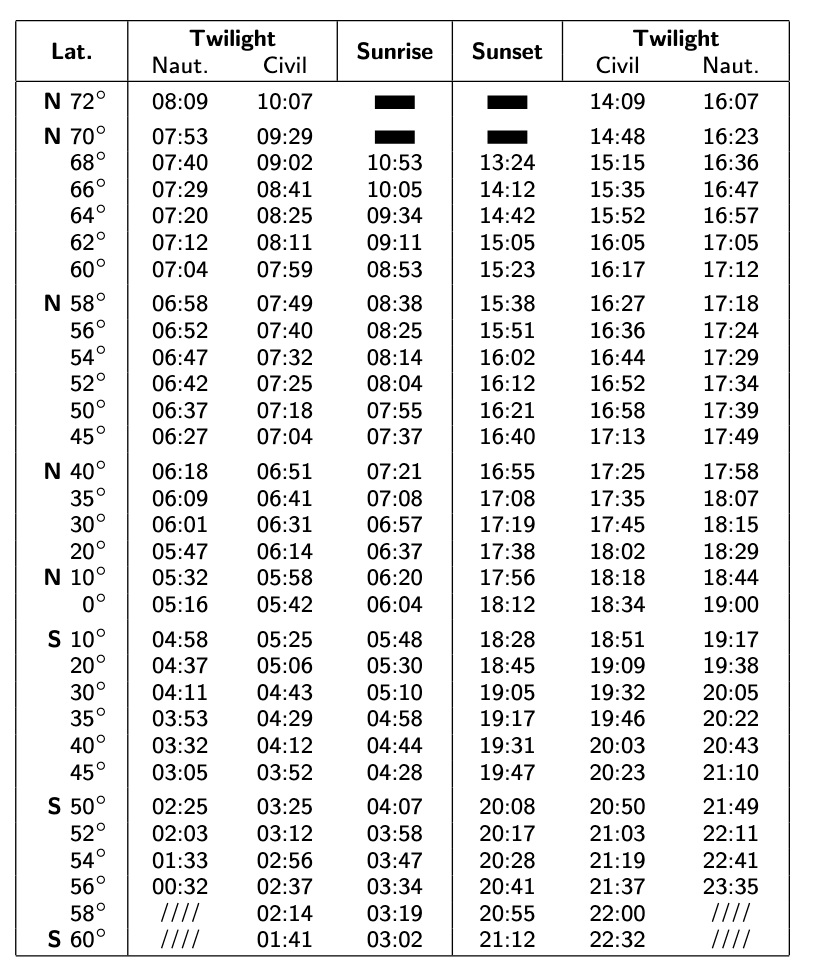
Nautical twilight is provided for each day in the pages of the Almanac. The time depends on the latitude and is given only in Greenwich Mean Time (UTC-0). You must calculate the time at your estimated position by adjusting for 15° per hour. Essentially, you need an estimated position to obtain an estimate of the time of nautical twilight.
The image below shows the information for twilight and dawn (nautical and civil) for the days of 10, 11 and 12 January 2026. We are only interested in the nautical information columns (Naut.). As we are interested in twilight, we therefore look at the last column. For example, at a latitude of 54° N, nautical twilight is at 17:29 UTC-0 on the Greenwich meridian.
If we were at an estimated position of 54° South, nautical twilight would be at 22:41 UTC-0 on the same meridian. (On the same meridian, there is a significant difference in time: this is because in January, it is summer in the southern hemisphere. The days are longer.)
As the position is approximate, the time will also be approximate. You should therefore keep an eye on the sky as the sun sets. When you can see both the identified stars and the horizon at the same time, you can begin.
Example
If you are at the approximate position 16°N, 35°W on 10 January 2026, identify a time slot for taking observations at twilight.
Solution
The information for 10 January is provided in the table above. At 10° N latitude, nautical twilight is at 18:44. At 20°N latitude, nautical twilight is at 18:29. This is a difference of 15 minutes between the two times. To find the twilight time at 16°N, we must interpolate and subtract 9 minutes. The twilight time is therefore 18:35 (UTC-0).
This time is for the Greenwich meridian (0°). However, we are at the estimated position of 35°W, so we must add 2 hours 20 minutes (35/15) to obtain the nautical twilight time at this estimated position. Twilight is therefore at 20:55 (UTC-0) at our estimated position.
A time slot for taking observations begins twenty minutes before the start of nautical twilight, so we will begin at 20:35 (UTC-0). As there is no information on the vessel’s local time, we cannot convert to local time.
Planning the observation period at dawn
The principle is the same, but this time the observation window begins 20 minutes before nautical dawn and ends 20 minutes after nautical dawn. In the almanac, we need to look at the first column.
Example
You are at the estimated position 06°N / 155°W on 11 January 2026. Identify the time of nautical dawn.
Solution
At 0° latitude, nautical dawn begins at 05:16 (UTC-0). At 10°N, nautical dawn begins at 05:32, a difference of 16 minutes. By interpolation, we obtain the time to the nearest 10 minutes (rounded) at a latitude of 6° North. Nautical dawn thus begins at 05:26 (UTC-0) at the Greenwich meridian.
As we are at latitude 155° W, we must add 10 hours and 20 minutes for nautical dawn to the estimated position. We therefore obtain the time of nautical dawn as 15:46 (UTC-0) at our estimated position.
Identifying visible stars using the reduction tables
For planning purposes, Volume 1 of the reduction tables is a fantastic tool. For a given estimated latitude and local hour angle at the vernal point (LHA), Volume 1 identifies six stars useful for navigation that will be visible. It also provides their azimuth (Z_n) and their calculated altitude (H_c).
Remember that the calculated altitude corresponds to the observed altitude if we are exactly at the estimated position. The azimuth corresponds to the direction in which to point the sextant. With Volume 1, we thus know in which direction to point our sextant, as well as the value to which it must be set!
Extract from Volume 1
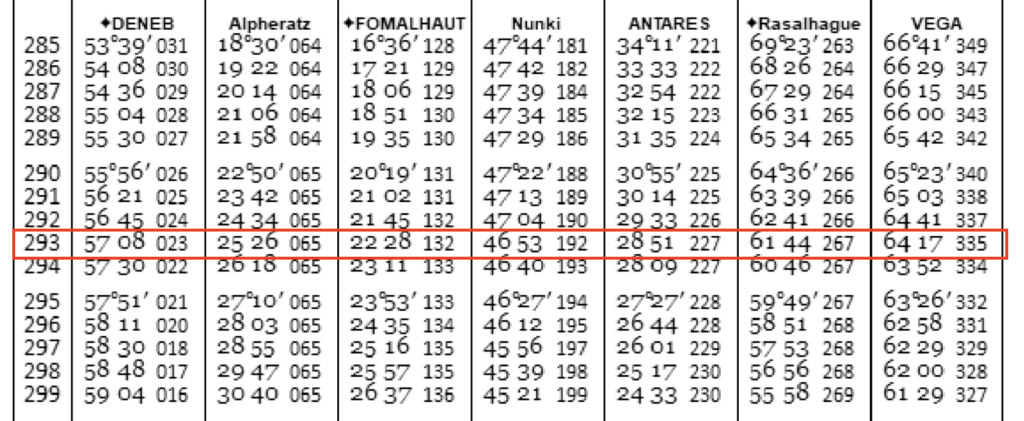
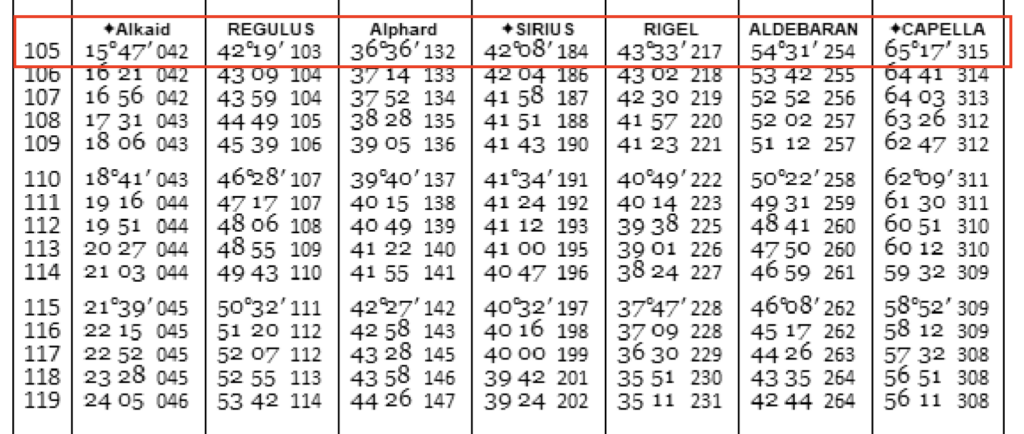
An extract from Volume 1 is shown below for a latitude of 47°N. Each row corresponds to information on six stars (identified in the column headers).
For example, the first row and first column of the table provide information on the star Deneb if our latitude is 47° N and our local hour angle with the vernal equinox is 180°. If we were at this position, Deneb would have a calculated altitude of 12° 03′ and an azimuth of 033°. It is therefore roughly north-northeast. We could thus preset our sextant to a sextant height corresponding to 12° 03′ and point it north-northeast to locate the star. Obviously, because our position differs from the estimated position, we will need to scan the sky in this region to find it.
For a latitude of 47° and a local hour angle (LHA) at the vernal point of 180°, we can thus identify six stars: DENEB, VEGA, ARCTURUS, SPICA, REGULUS, POLLUX and CAPELLA.
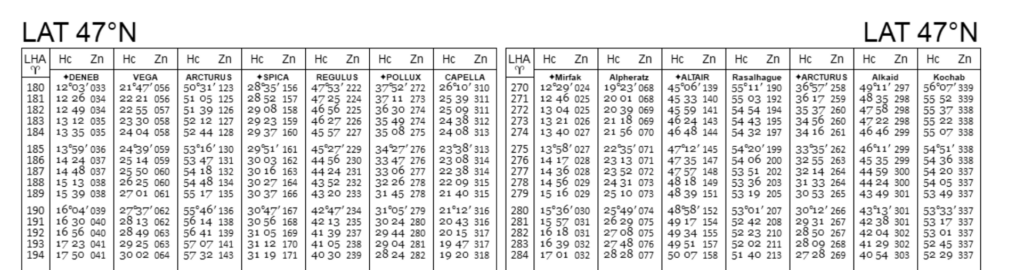
Note that the stars are not the same if the LHA changes. For an LHA of 270°, the stars are Mirfak, Alpheratz, ALTAIR, Rassalhagus, ARCTURUS, Alkaid and Kochab. This is normal; if the LHA (or latitude) is different, the part of the sky we see is different!
Choose three stars to minimise the position error
Of the six stars, we need to identify three that should be prioritised. We want to select those which, together, will minimise the uncertainty regarding our position. Under ideal conditions, this will be our ‘first trio’.
In coastal navigation, we know that we can choose three landmarks to ensure that the position triangle is close to an equilateral triangle. When this is the case, the position error is minimised. Because the complement of 60° is 120°, position lines that are 120° apart will also form a position triangle with an angle of 60°. We shall apply the same idea in celestial navigation.
In the section on reducing sextant observations, we saw that the position lines are always at 90° to the azimuth of the star’s foot. Consequently, if two azimuths are 60° apart, the position lines will also be 60° apart. Similarly, if two azimuths are separated by 120°, they will also form an angle of 60° in the position triangle, as we are simply measuring the exterior angle of the triangle. Consequently, choosing stars with an azimuth separation of 60° or 120° is equivalent to choosing position lines that will minimise the position error.
Of the six stars provided in Volume 1, we should therefore select the three stars with the azimuth separation closest to 60° or 120°. This will be our first trio. We must, however, pay attention to the other stars. If the weather or sea conditions are such that our first trio does not constitute a practical bearing, we can fall back on these other stars.
Example
You are at the estimated position 16°N, 35°W on 20 November 2026. Your eyes are 2 m above sea level and your sextant’s index error is -0.1′. Identify six stars that will be visible at twilight. Identify three stars that minimise the position error and determine the initial setting of your sextant to find them.
Solution
On 20 November 2026, nautical twilight begins at 1823 at 10°N and at 1810 at 20°N. By interpolation, it therefore begins at 1818 (UTC-0).
At 1800, the vernal point is at GHA 327° 47.1′. To account for the additional 18 minutes, we must add 4° 30.0′ to the position at 1800. Thus, at 1818, the vernal point is at GHA 332° 17.1′.
Because we are in the west and our longitude is less than the vernal point’s GHA, our local hour angle (LHA) corresponds to 292° 47.1′.
We must therefore look in Volume 1 for the page corresponding to a latitude of 16°N and the line corresponding to an LHA of 293° (292° 47.1′ rounded). Page 129 is the one we are looking for. An extract is shown below. The stars of interest are DENEB, Alpheratz, FOMALHAUT, Nunki, ANTARES, Rasalhague and VEGA.
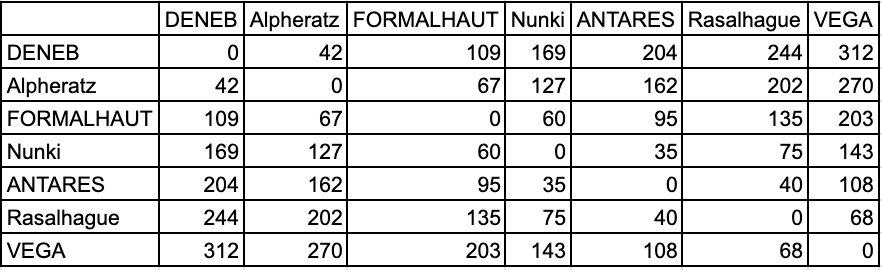
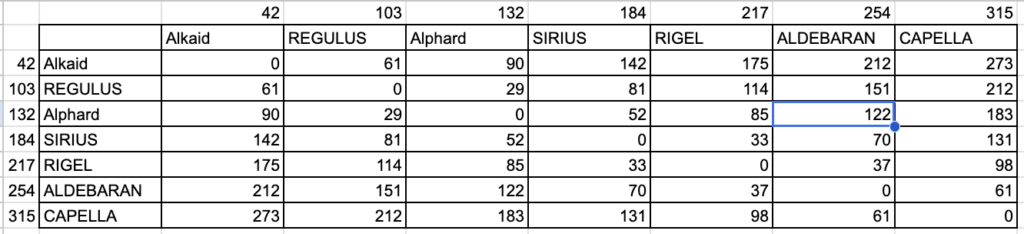
We now seek to identify the trio of stars whose azimuths intersect at an angle close to 60° or 120°. There is no magic formula. We must calculate the azimuth differences between each of them and identify the most promising trio. We can use a spreadsheet (Excel) if we have a computer on board. The table below shows the angular difference between the stars’ azimuths (the original is here). It can be seen that the trio comprising FORMALHAUT, Alpheratz and Nunki forms near-ideal intersections: 67°, 60° and 127°.
Thus, we should begin our sextant observations at around 17:58 (twenty minutes before nautical twilight), and sight the stars FORMALHAUT, Alpheratz and Nunki.
To determine the sextant setting, the corrections must be applied in reverse. We must therefore identify the correction for the stars and subtract it from the calculated altitude to arrive at the apparent altitude. Next, we must apply the inverse corrections for the index and elevation errors to arrive at the sextant altitude. The procedure is set out in detail in the table below.
For the star FORMALHAUT, the calculated altitude is 22° 28′. To arrive at this observed altitude, the apparent altitude must be 22° 30.3′, as this is the altitude consistent with the correction of -2.3′ listed in the table (22° 30.3′ – 2.3′ = 22° 28′). Thus, the correction for the star is -2.3′ and the apparent altitude is 22° 30.3′. The elevation correction is -2.5′ at 2.0 metres. Taking into account the index error, this gives a sextant altitude of 22° 32.7′. If you wish to check your work, the best approach is to carry out the standard correction procedure to see if you arrive at the calculated altitude.
The azimuth and theoretical altitude data are recorded in the table below.
| FORMALHAUT | Nunki | Alpheratz | |
| Calculated altitude H_c | 22° 28′ | 46° 53′ | 25° 26′ |
| Correction (star) | -2.3′ | -0.9′ | -2.0′ |
| Apparent altitude H_c | 22° 30.3′ | 46° 53.9′ | 25° 28.0′ |
| Elevation correction | -2.5′ | -2.5′ | -2.5′ |
| Index correction | -0.1′ | -0.1′ | -0.1′ |
| Initial setting (altitude at the sextant H_s) | 22° 32.7′ | 46° 56.3′ | 25° 30.4′ |
| Azimuth Z_n | 132° | 192° | 065° |
At 1758 (UTC-0), one should therefore focus on FORMALHAUT, Nunki and Alpheratz. If one wishes to start with the star FORMALHAUT, one should set the sextant to 22° 32.7′ and look in the direction of 132° (south-east).
Procedural summary
Here is a procedural summary for creating a observation plan using Volume 1 of the Ho249 tables.
- Identify the time window for making astronomical observations (e.g. nautical twilight – 20 minutes, or nautical dawn).
- Identify the position of the vernal point at the specified time.
- Calculate the local hour angle.
- From Volume 1, determine the six stars visible at the estimated latitude and the identified local hour angle.
- Identify the three stars with the best overlap (60°, 120°). Note the calculated altitudes and azimuths.
- Calculate the sextant altitude associated with the calculated altitude.
Identify the visible stars using the star chart
The main drawback of the above approach is that it provides no reference points for identifying the stars. This is the great advantage of the star chart. To determine which stars – and which constellations – will be visible at twilight, we must first identify our zenith on the chart. Next, we can identify which stars will still be visible on the evening of our observation by drawing a circle around the zenith. Finally, we can make contextual observations to help identify the stars. In particular, identifying constellations can be useful for locating stars of interest.
The Zenith is the point on the celestial sphere that will be directly above our heads. To identify it, we need our estimated declination and our sidereal hour angle (SHA). Our estimated declination is easy to obtain: it is our latitude (on Earth) projected onto the celestial sphere. For the sidereal hour angle, we need to take our local hour angle and project it onto the celestial sphere. I’ll illustrate how to do this using the detailed example from the previous section.
A handy tip for identifying the visible sky is to draw a circle around the zenith. The radius of this circle is such that the circle reaches the nearest pole (north or south, depending on our declination). In practice, this circle is not exactly a circle, as Mercator projections distort surfaces. However, the stars within this circle will always be visible.
Example
If, at twilight, our latitude is 16°N and our local hour angle (LHA) is 292° 47.1′, where is our zenith on the sky chart?
Solution
Our declination is our latitude (16°N). The two coordinates are always identical (but are not on the same sphere). Furthermore, if we have a local hour angle of 292° 47.1′, this means that the vernal point is 292° 47.1′ west of our position. This means that our sidereal hour angle is 67° 12.9′ (360° – 292° 47.1′). We can then use these coordinates to identify our zenith (image below).
Identifying the visible sky
Following the same example, we can thus identify the visible stars using the image below.
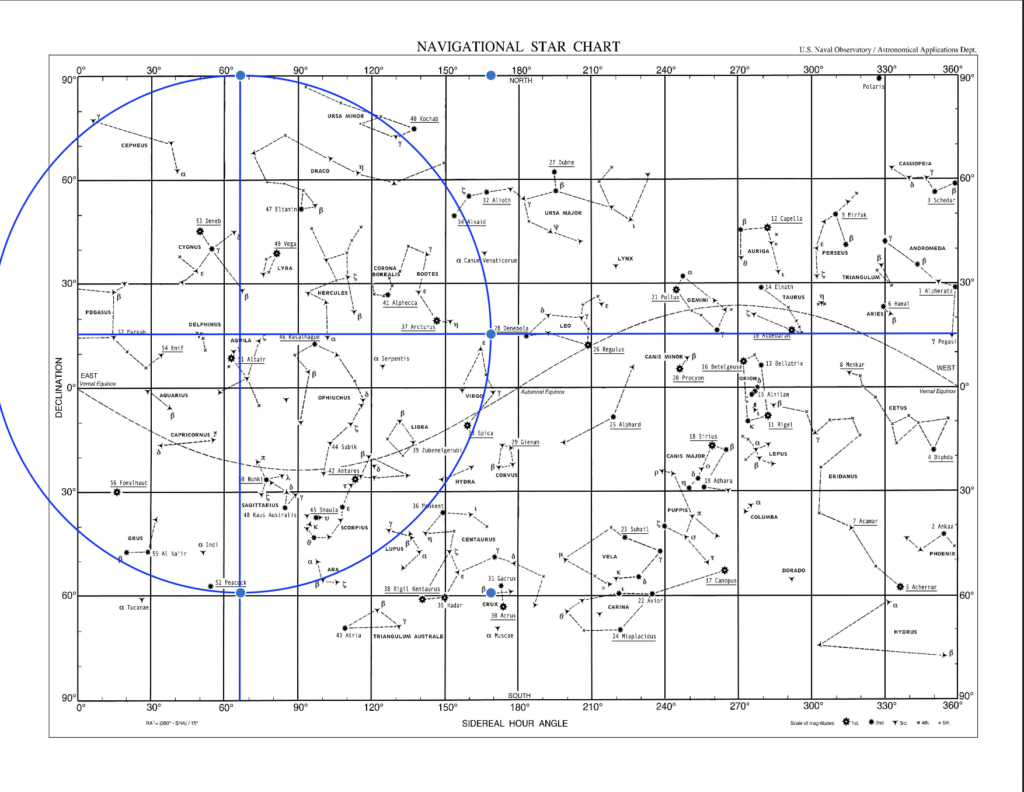
In conjunction with the stars identified in the previous section, we can contextualise their position in relation to the star chart.
- The star Alpheratz is part of the constellation Andromeda. In particular, it forms one corner of a straight line of three stars.
- FORMALHAUTZ stands alone, to the west of the constellation Sagittarius.
- Nunki is in the constellation Sagittarius.
This information provides reference points for identifying the stars during the observation period. If we combine this information with that obtained from the reduction tables, we can thus obtain a fairly clear picture of the planned observation. Below, I show the two sets of information combined on the star chart. The azimuths of the selected stars are shown in red (and because we are looking at the chart from below, the azimuth is measured starting from the north, in an anti-clockwise direction).
Exercises
Exercise 1
Using the data from the example in this text, identify the sextant altitudes of the stars Nunki and Alpheratz.
Solution
See the table labelled ‘solution to Exercise 1’ in this text.
Exercise 2
Using the data from the example in this text, identify another trio of stars that would be good candidates for an astronomical observation.
Solution
We are looking for stars with an intersection angle of 60° or 120°. There is no triple star system with angles as close as the one chosen first, but another triple star system would be Vega, Rasalgue and Antares. The intersection angles are 68°, 108° and 40°. The star chart showing this selection of stars is below.
Exercise 3
On 24 December 2026, you are at the approximate position of 30° 40’N / 077° 07.5’W (somewhere off the coast of Florida). Identify three stars that can be used to take a position at dawn. Given that your sextant has an index error of 0.3′ and that your eyes are 1.5 m above sea level.
Solution
Nautical dawn is at 0557 for a latitude of 30°N and at 0606 for a latitude of 35°N. By interpolation, we find that nautical dawn begins at 0558 (UTC-0) for a latitude of 30° 40’N. This will be the start of our observation period.
At 0500, the Greenwich Hour Angle (GHA) of the vernal point is 167° 44.7. The correction of 58 minutes is 14° 32.4′. Thus, the GHA of the vernal point is 182° 17.1′.
Given that the GHA is greater than our estimated longitude, the local hour angle (LHA) is simply the difference between the two, i.e. 105° 9.6′. For the purposes of the reduction tables, this can be rounded to 105°.
The azimuth cross-checks are analysed in the table below. Three interesting stars are SIRIUS, ALDEBARAN and Alphard, with angles of 70°, 52° and 122°. (Other stars are possible, but note that the trio of ALDEBARAN, CAPELLA and Alphard does not work, despite intersections closer to 60° and 120°, because the intersection between Alphard and Capella is almost 180°, maximising the position error.)
The azimuths of the selected stars are shown in the star chart below.

The eye height results in a correction of -2.2′. The table below allows you to calculate the initial setting (H_s) from the information provided.
| SIRIUS | ALDEBARAN | Alphard | |
| Calculated altitude H_c | 42° 08′ | 54° 31′ | 36° 36′ |
| Correction (star) | -1.1′ | -0.7′ | -1.3′ |
| Apparent altitude H_c | 42° 09.1′ | 54° 31.7′ | 36° 37.3′ |
| Elevation correction | -2.2′ | -2.2′ | -2.2′ |
| Index correction | 0.3′ | 0.3′ | 0.3′ |
| Initial setting (sextant altitude H_s) | 42° 11.6′ | 54° 34.2′ | 36° 39.8′ |
| Azimuth Z_n | 184° (due south) | 254° | 132° |
Conclusion
The planning exercise is very useful for a new voyage. It ensures you are ready when the precious 20 minutes of twilight allow you to take your observations. This means you can focus on the observations and their timing.
Nor is it forbidden to use an astronomical navigation app (e.g. Stellarium) to help identify the stars. This type of app relies on GPS coordinates to identify your position (which is no longer estimated at all!). Purists will therefore argue that the use of a GPS goes against the very idea of astronomical navigation. For learning to recognise the sky, it’s not a bad idea. For examination purposes, or in an emergency (power cut, etc.), however, you’ll want to be able to identify the stars yourself.
Did you enjoy this article? You can continue reading the rest of the series on astronomical navigation, or visit the Learn page on this site.
1 Response
[…] How to plan your star sightsApplication: performing a noon sightApplication: a complete star sightApplication: the sun-run-sun techniqueApplication: finding the compass deviation […]