This text is the fourth in the series on astronomical navigation. It deals with the corrections to be made to observations taken with a sextant. The text on how to take observations with a sextant should be read first.
For reasons that will be explained later, the observed altitude of a celestial body is subject to errors. We covered the index error in the text on sextant observations. This text covers the other errors, namely:
- the dip error;
- errors for the Sun and the Moon;
- errors for stars and planets.
Each group of errors must be corrected before proceeding to the other steps involved in determining our position. The applicable corrections are available in the form of correction tables in the almanac.
But first, we will cover the notation, then the corrections specific to the sources of error. Finally, we will look at a few examples. Once the concepts are understood, it is simply a matter of addition and subtraction.
Sextant altitude, apparent altitude and observed altitude
There are three types of altitude, reflecting the progression of corrections that are incorporated: sextant altitude, apparent altitude and observed altitude. Remember that altitude is the term used to measure the angle between the celestial body and the horizon.
The altitude obtained by reading the sextant scale is called the sextant altitude (denoted H_s). This is the ‘raw’ altitude, i.e. the one read directly from the sextant scale. It includes no corrections.
The altitude including the index and elevation corrections is called the apparent altitude (denoted H_a). The apparent altitude incorporates errors dependent on the observer, namely the index error (the quality of the sextant) and the elevation error (the elevation of the person above sea level).
The altitude including all corrections is called the observed altitude (denoted H_o). It is this height that is used for the rest of the calculations. Compared to the apparent height, it incorporates corrections that depend on the environment: refraction error, parallax error and semi-diameter error.
If the corrections are applied correctly, we will thus move from the sextant height to the apparent height, and then to the observed height.
The order of corrections matters
Errors dependent on the observer must be corrected before errors dependent on the environment. The reason is that most tables used to correct environment-dependent errors are based on the value of H_a, i.e. the altitude incorporating the index and elevation corrections.
Index error
The index error arises from the fact that a sextant’s scale is not perfectly aligned with its mirrors. The index error corresponds to the angle required on the sextant to ensure that the image of the horizon is clear. A typical error can vary between 0.5′ and -0.5′. It is empirical and depends entirely on the sextant you are using.
As sextant altitude readings are taken from the scale, this index error must be added or subtracted to correct the scale:
- Add the absolute value of the index error if it is negative.
- Subtract the absolute value of the index error if it is positive.
The absolute value corresponds to the magnitude of the error, regardless of the sign. For example, if the index error is -0.5′, its absolute value is 0.5′. You must therefore add 0.5 to the sextant’s altitude. Conversely, if the index error is 0.4′, its absolute value is 0.4′. We must therefore subtract 0.4′ from the sextant’s height.
Elevation error
The elevation error arises from the fact that the higher one is above sea level, the further one can see. If our sextant measurement is taken from a location high above sea level, we will measure a greater celestial body height. As our subsequent calculations depend on the height at sea level, a correction must be made.
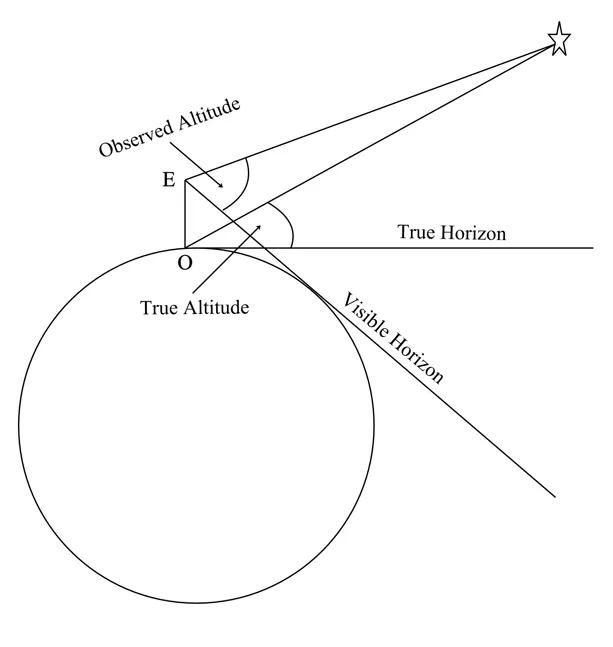
In the image below, the observer at position ‘O’ sees the true horizon, i.e. the one that is horizontal (true horizon line). The observer at position ‘E’, above sea level, can see a horizon that lies further inland (visible horizon line). Consequently, the sextant altitude measured by observer E is greater than that of observer O.
The image is, of course, an exaggeration, but it illustrates that the higher up we are, the greater the error in our sextant height measurement.
The elevation measurement corresponds to the height of the eye, that is to say, the height of the ship’s deck plus the observer’s height. Thus, if one is on the deck of a sailing vessel that is 1 m above sea level and one is 1.80 m tall, then the elevation is 2.8 m. If, on the other hand, you are on the bridge of a commercial vessel, 11 metres above sea level, you must add your height to 11 metres to obtain the elevation. If you are flying in an aeroplane at an altitude of 2,000 feet, you must also correct for this height!
This error can be corrected either using a formula or by consulting a table in the almanac.
Formulas
The formulas for correcting the elevation are as follows:
\begin{align}
C &= 0.97\sqrt{E},~(E\text{ in feet}),\\
C &=1.76\sqrt{E},~(E\text{ in metres}),
\end{align}
where E is the elevation and C is the correction in minutes. The formula is essentially the same, but the multiplier (0.97 vs 1.76) changes depending on the units used.
For example, for a height of 15 metres, the correction required is:
\begin{align*}
C&= 1.76\sqrt{15},\\
&\approx 6.8'.
\end{align*}
This correction is always negative, in the sense that it must always be subtracted. This makes sense: because we are higher up, the sextant reading is too large. We must therefore subtract to bring it back to the horizon.
Correction table
For those who don’t like formulas, the correction to apply based on elevation is available in the Almanac, on the Altitude Correction Tables page (p. 281 for the 2026 Almanac). To identify the correction, you need to find the elevation of the measurement (Ht of Eye column) in either feet or metres. Then, read the corresponding correction.
Corrections are given only for the extremes of a range of elevation values. If your elevation falls between the two, you must use the correction associated with that range of values. For example, if your elevation is 2.9 metres, the correction to apply is -3.0′, as this correction applies to elevations between 2.8 metres and 3.0 metres.
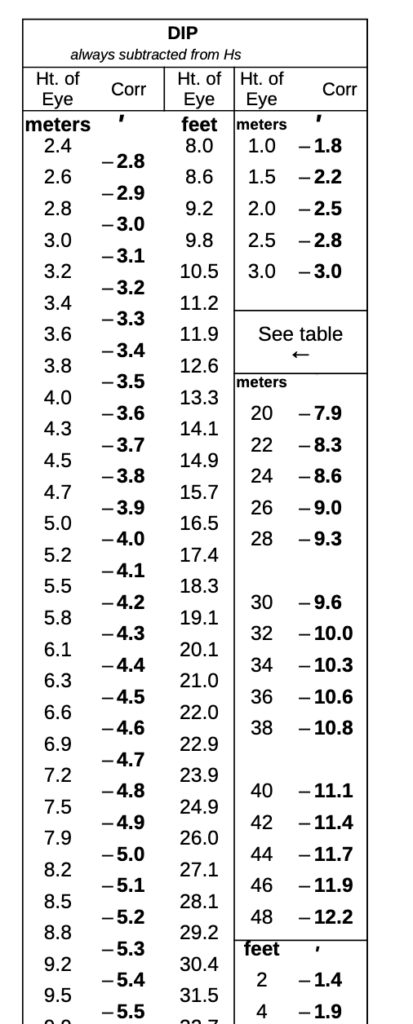
You must always subtract the absolute value of the elevation correction. In the correction tables, the negative value is already included in the table. This makes sense: because we are higher up, we have a sextant reading that is too high. We must therefore subtract to bring it back to the horizon.
Errors for the Sun and Moon
Conceptually, there are three sources of environmental errors for the Sun and the Moon: light refraction, the celestial body’s semi-diameter, and parallax error. In practice, these three errors are combined into a single correction table.
Light refraction
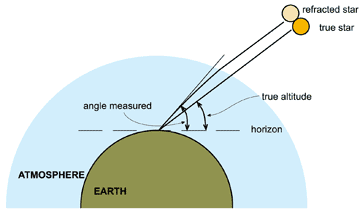
The Earth’s atmosphere influences the path of light rays. As they enter the atmosphere, light rays are slightly deflected from their straight path. This phenomenon is well understood in optics and is called refraction. The lower the observed celestial body is on the horizon, the greater the effect of refraction will be. It is therefore necessary to correct for the refraction of light to ensure that the true altitude of the celestial object is obtained.
Semi-diameter
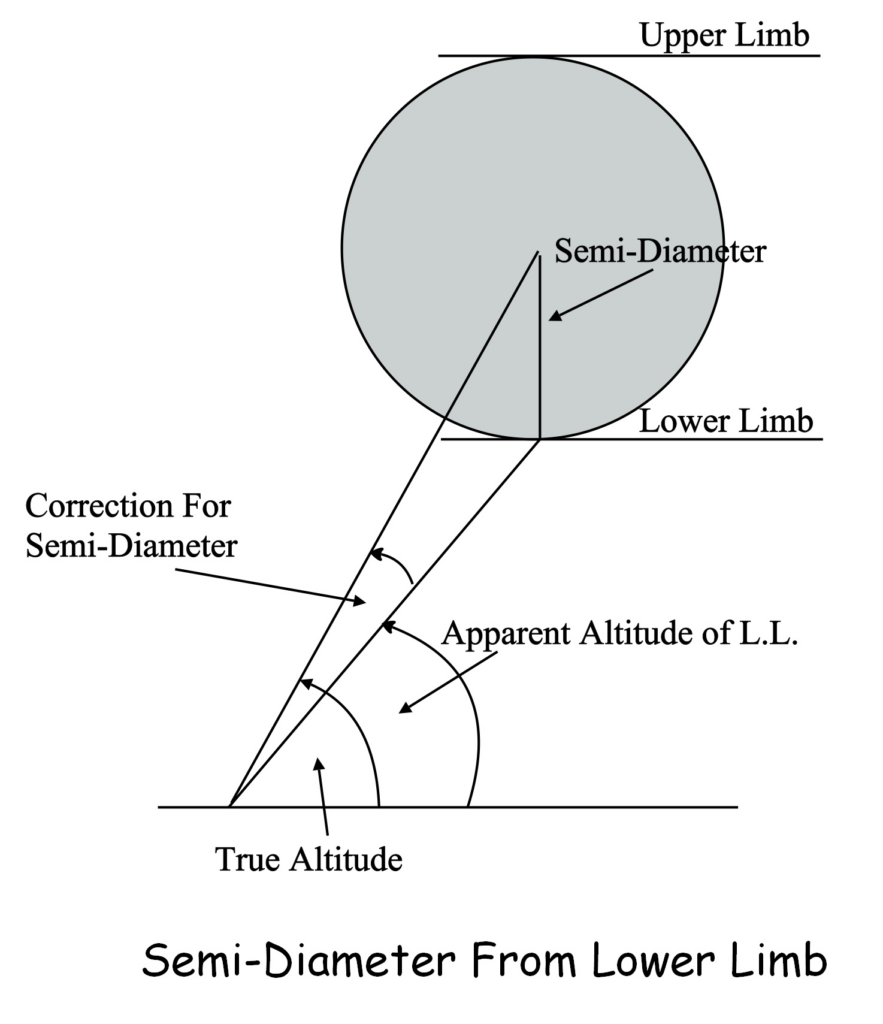
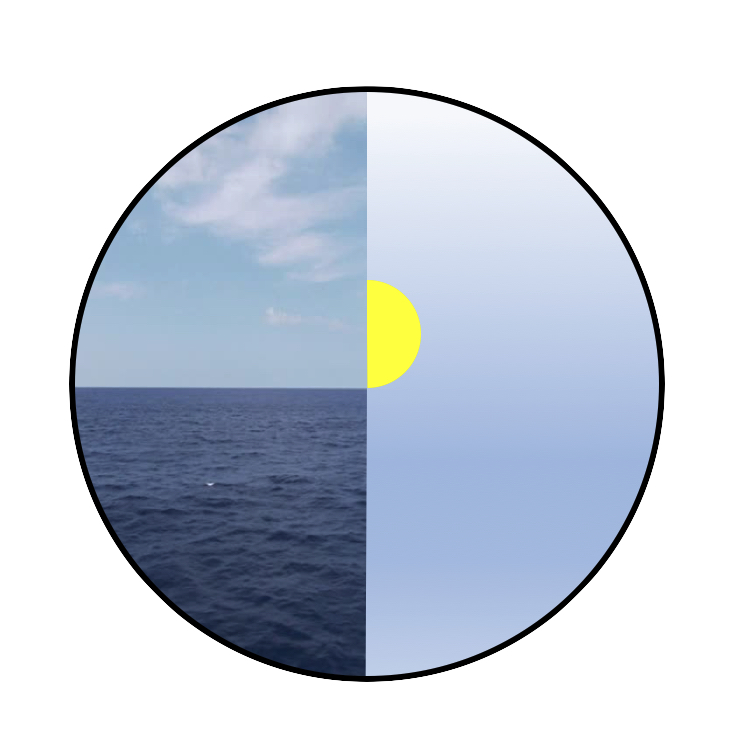
Unlike stars, the Moon and the Sun are not ‘distant points’, but large spheres in the sky. Consequently, the altitude observed with a sextant depends on the part being sighted: the centre, the upper limb, or the lower limb.
The image above illustrates the concept. If the upper part of the Sun (upper limb) is measured, the sextant reading will be greater. If the lower part (lower limb) is measured, the sextant reading will be smaller.
To correct this measurement error, the established practice is to avoid measuring the centre, but rather to measure, as desired, either the upper limb or the lower limb, and then apply a correction to obtain the exact value for the centre. This correction is known as the semi-diameter correction (i.e. the radius!).
This correction varies depending on the celestial body (Sun, Moon), the apparent altitude (H_a) and the time of the year.
Distance error to the celestial body
Because the Earth moves closer to and further from the Sun throughout the year, the apparent diameter of the Sun also varies depending on the month of the year. Consequently, the correction for the Sun also depends on the month of the year.
Because the Moon moves closer to and further from the Earth over the course of the lunar month, the Moon’s apparent diameter varies depending on the day of the lunar month. This correction is presented in terms of horizontal parallax (denoted HP, for horizontal parallax).
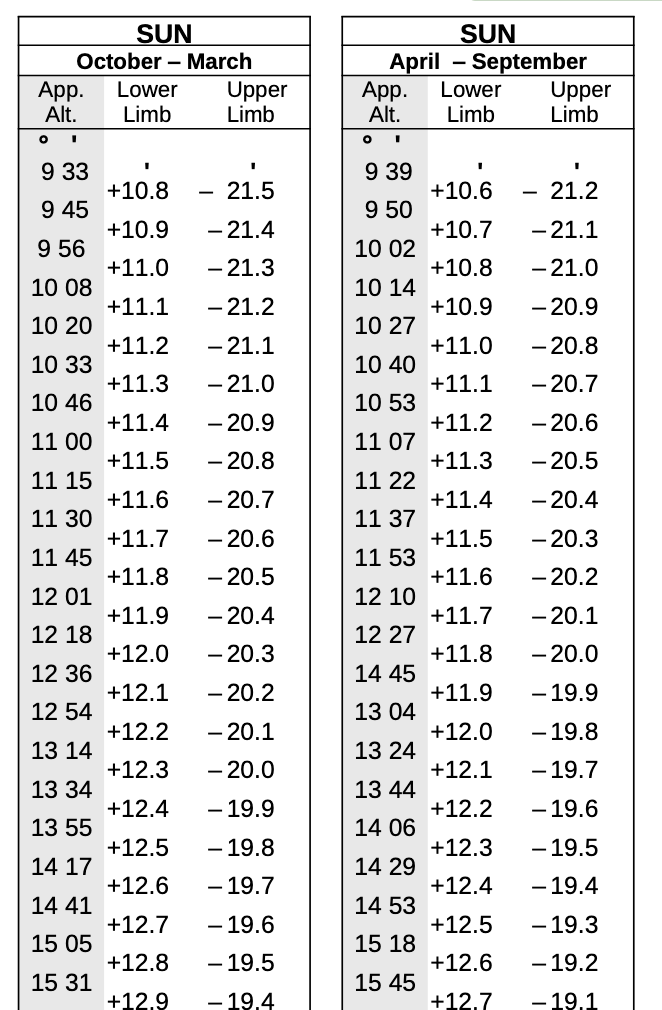
Correction table for the Sun
The correction table for the Sun is shown below. Each column is reserved for corrections for the lower limb and the upper limb. For example, for an apparent altitude of 10° and for an observation taken in March, the Sun correction for the lower limb is 11.0′.
Note that the first page of the correction tables gives corrections for angles greater than 10°. The following page details the corrections for angles less than 10°.
These combined corrections must always be added together.
Correction table for the moon
The corrections for the moon are presented in two separate tables.
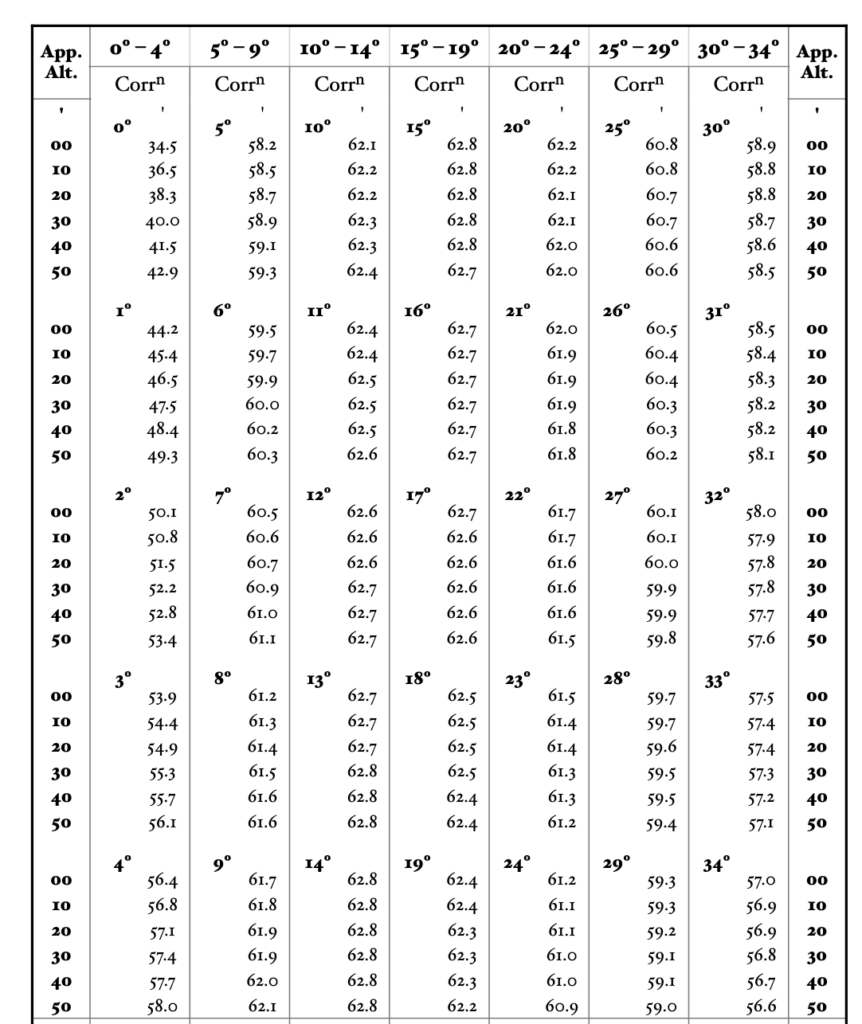
First table
The first table shows a correction based on apparent altitude. The apparent altitude (H_a) must be broken down into degrees and minutes. The degrees are used to identify a column in the table, and the minutes are used to identify a row. You must therefore identify the column corresponding to the range of degrees relevant to you. Within this column, you must then identify the section that applies to the degrees of the altitude. Finally, you must identify the row corresponding to the minutes of your reading (rounded to the nearest tenth).
For example, for an apparent altitude of 12° 22′, go to the third column (range from 10° to 14°), then go to the section specifically covering the value of 12°. Within this section, take the row corresponding to 20′ (22 minutes rounded). You can then read the correction of 62.6′ (i.e. 1° 2.6′). It is not forbidden to interpolate if the variation between two tenths is significant.
This is not stated directly in the table, but is specified in the adjacent note. You must subtract 30′ from this correction if you have measured the upper limb of the moon. If you have measured the lower limb, no adjustment is required.
The resulting correction must always be added.
Second table
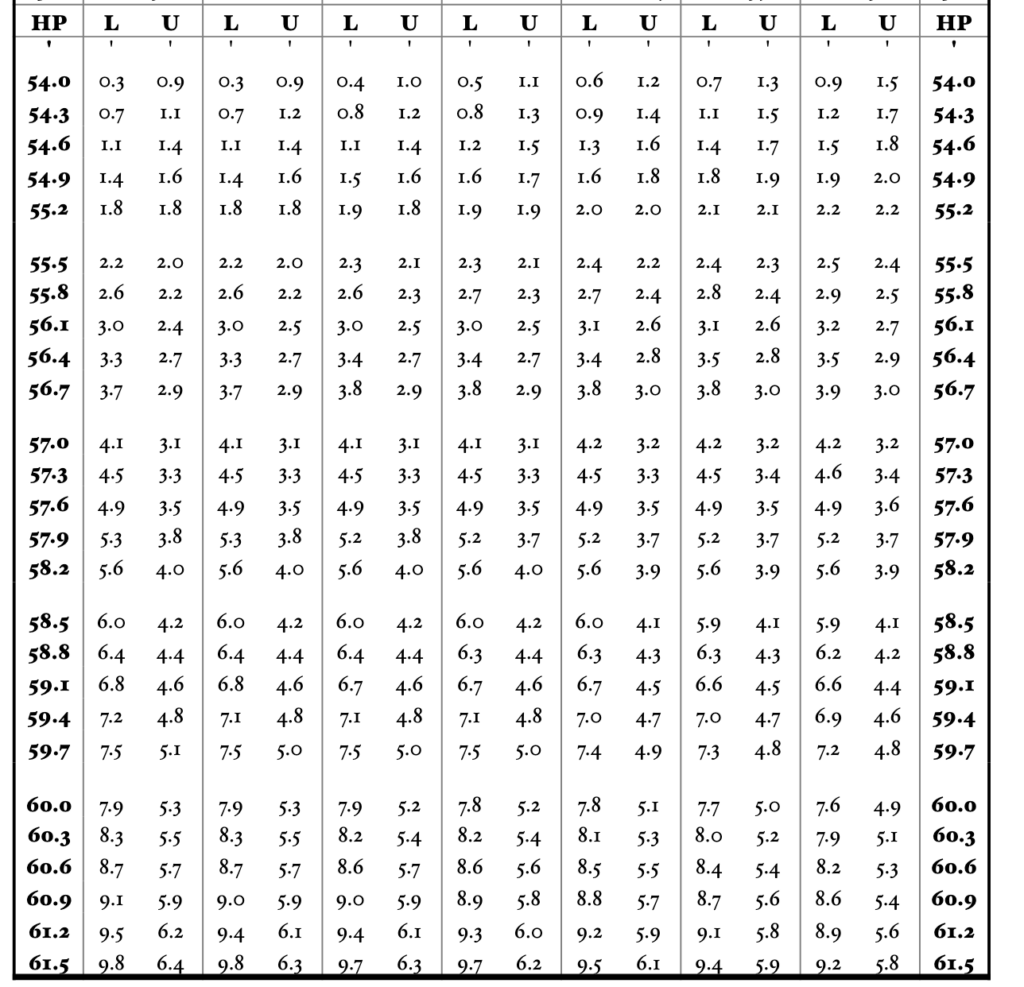
The second table provides a correction to account for changes in the distance between the Earth and the Moon. This correction is based on the horizontal parallax (HP). The HP value is obtained from the section of the Almanac used to determine the Moon’s GP. This value varies from hour to hour.
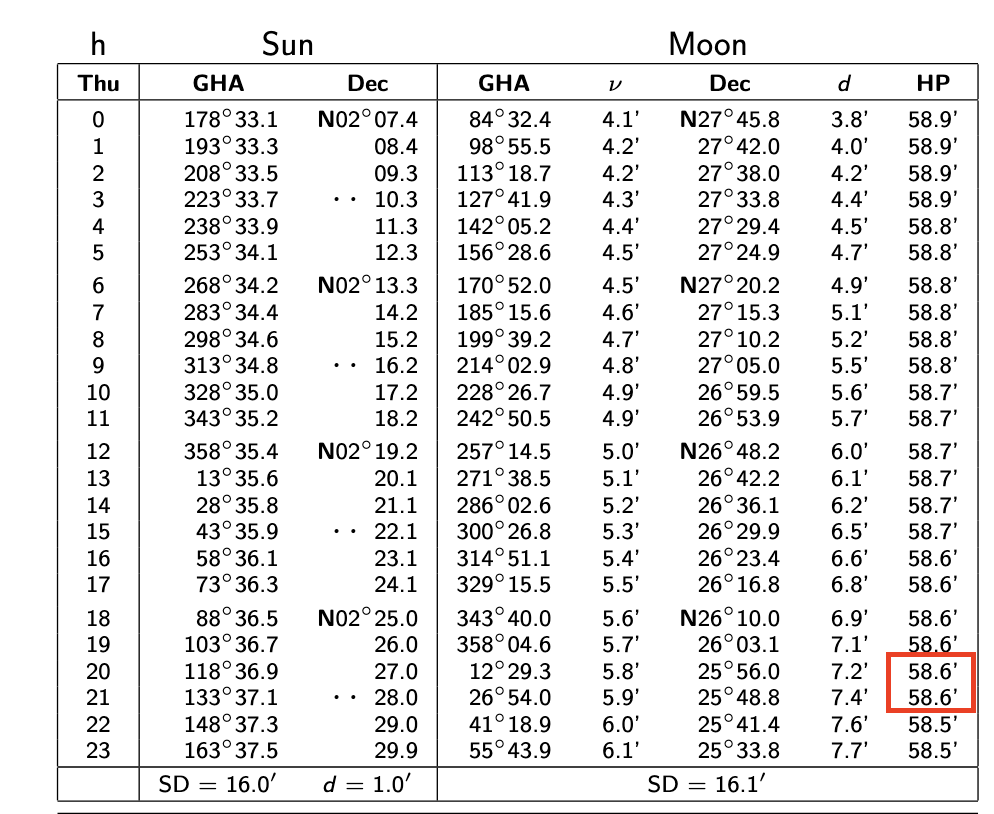
For example, for 15 December 2026, the HP values are shown hour by hour for the Moon in the table below (page 235 of the Almanac).
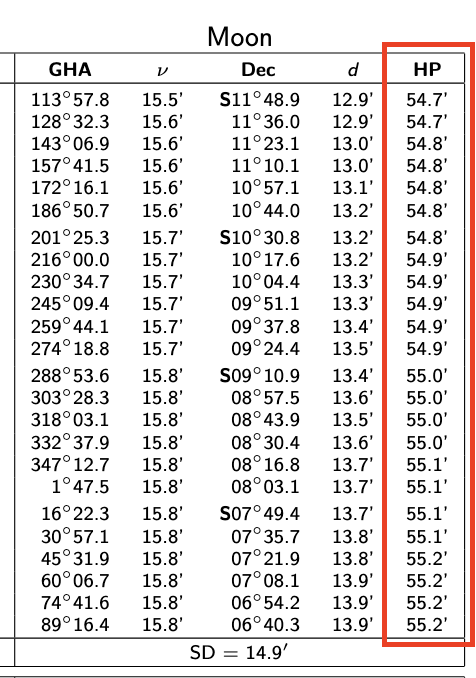
Once this value has been obtained, you must refer to the table of corrections for the Moon. You then simply need to identify the row corresponding to the value obtained and select the column corresponding to the range of degrees identified in the previous table.
In the image below, this header is not shown, but it is the same as in the previous table (0°–4°, 5°–9°, 10°–14°, etc.). Once the column and row have been identified, note the ‘L’ if you have measured the lowerlimb and note the ‘U’ if you have measured theupper limb.
For example, for a horizontal parallax of 54.9 minutes and an apparent altitude of 12° 22′, you should look at the fourth row of the table and note the values in the third column (10°–14°). If the observation was made on the lower limb of the Moon, then the correction is 1.5′.
This correction must always be added.
Errors for stars and planets
For stars other than the Sun, there are two sources of error: refraction and horizontal parallax error. The same applies to planets.
In practice, these errors are combined into a single table for all stars and all planets. For Mars and Venus, which are the two planets closest to Earth, additional corrections must, however, be applied.
Corrections for stars and planets
The corrections are combined in a table (on the same page as for the elevation). For example, for an apparent altitude of 10° 55′, the correction is -4.9′.
These combined corrections must always be added together.
Corrections for Mars and Venus
Mars and Venus are the two planets closest to Earth. Compared to the others, they are ‘close’ and require corrections specific to their proximity. You must apply the corrections for stars and planets presented above and apply the corrections specific to them.
These corrections depend on the date, time and observation, so they can be found in the general pages of the Almanac. Below, the additional corrections for Mars and Venus for 18, 19 and 20 December 2026 are on page 236 of the 2026 Almanac. They are summarised in a small table at the bottom of the page:
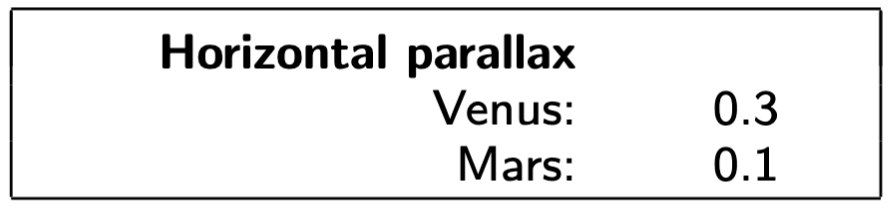
Thus, for Venus, 0.3′ must be added to the apparent altitude. For Mars, 0.1′ must be added to the apparent altitude.
Procedural summary
The application of the corrections can be summarised as follows:
- Take a sextant observation. Note the sextant altitude (H_s) and note the exact time.
- For the Sun and the Moon, also note which part of the celestial body was measured (upper limb, lower limb).
- Apply the index and elevation corrections to obtain the apparent altitude (H_a)
- For index corrections: add if the error is negative and subtract if the error is positive.
- For elevation corrections, the correction must always be subtracted.
- Apply the corrections specific to each celestial body to obtain the observed altitude (H_o)
- For the Sun, use the combined corrections from the appropriate table. You need to know the month of the observation.
- For the Moon, use the combined corrections from the appropriate table. You need to know the horizontal parallax (given in the general pages of the Almanac).
- For other stars and planets, the combined corrections in the appropriate table.
- For Mars and Venus, the specific additional corrections, as specified in the pages of the Almanac.
- These corrections must always be added together.
- Perform the other calculations to obtain the right ascension, taking only the observed altitude into account.
Examples
The first three exercises below are plausible observations in spring, from the east coast of Newfoundland. The last example is a plausible observation in winter, somewhere in the Caribbean. For the purposes of applying the calculations, the geographical location is irrelevant.
Example 1
On 28 March 2026, you observe the lower limb of the Sun and obtain a sextant reading of 41° 06′. Your sextant has an index error of -0.2′. Your observation was made 12 metres above sea level (including your height). What is the observed altitude of the Sun?
Solution
- You must add the index height to your sextant height to obtain 41° 08′.
- The dip error is -6.1′. You must subtract this value to obtain 41° 1.9′. The apparent altitude H_a is therefore 41° 1.9′.
- For the month of March, the combined correction for the lower part of the Sun is 15.1′. The observed altitude is therefore 41° 17.0′.
Example 2
On 26 March 2026 at 20:26 UTC-0, you take a reading of thelower limb of the moon to obtain 58° 33.2′. Your sextant has an index error of 0.3′. Your observation was made 3 metres above sea level (including your height). What is the observed altitude of the Moon?
Solution
- You must subtract the index error to obtain: 58° 32.9′.
- The dip error is -3.0′ (in extreme cases, we could have taken 3.1′). The apparent altitude is therefore 58° 29.9′.
- Go to page 59 of the Almanac to identify the horizontal parallax of the moon. The value is 58.6′ for 20:00 and for 21:00 (table below). It is therefore not necessary to interpolate.
- The first correction for the Moon is given in the first table (column 55°–59°, row 30′) and corresponds to 40.2. This correction must be added to obtain 59° 10.1′. It is not necessary to subtract 30′ as we have taken the lower part of the Moon.
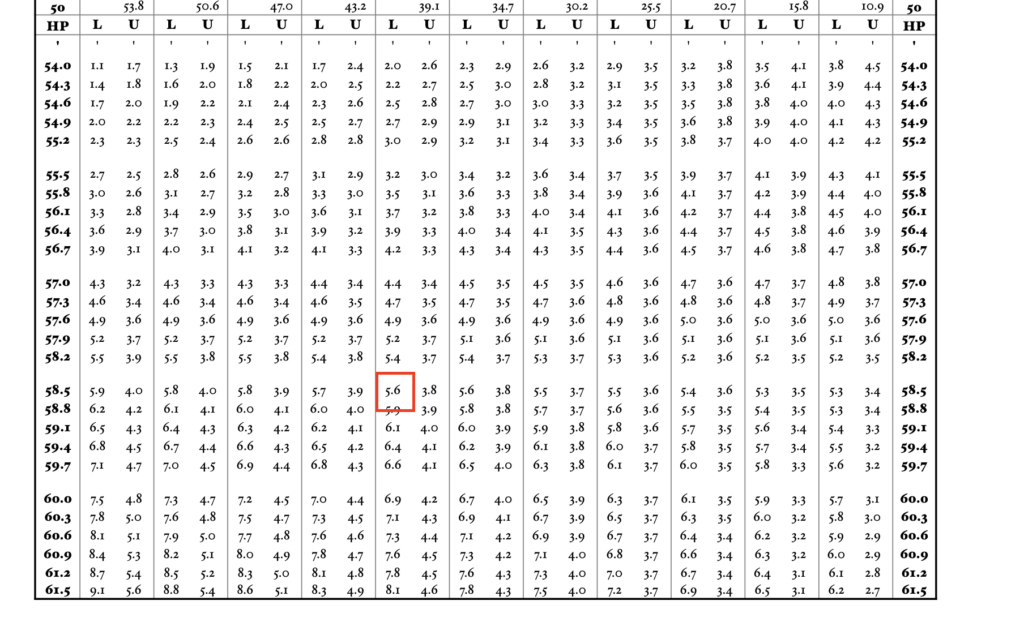
- The second correction for the Moon is given in the second table (see other image below). The value of 58.6′ is not directly available in the table. The correction for 58.5′ is 5.6′. The correction for 58.9′ is 5.9′. By interpolation, we therefore obtain a correction of 5.7′ (rounded). This correction must be added to obtain the observed altitude of 59° 15.8′.
Example 3
On 26 March 2026, you take a sextant reading of the star Capella and obtain a sextant altitude of 46° 06.4′. Your index error is -0.1 and your observation is at sea level. What is the observed altitude of the star?
Solution
- You must apply the index error. As it is negative, you must add its value to obtain 46° 06.5′.
- The elevation error is zero, as we are at sea level. The apparent altitude is therefore 46° 06.5′.
- We must consult the correction table for stars and planets to obtain a correction of -0.9′. The observed altitude is therefore 46° 05.6′.
Example 4
Whilst you are near Guadeloupe on 29 November 2026, you take a sextant reading of the planet Mars and obtain a reading of 61° 15.0′. Your elevation is 15 feet (including your height) and your sextant has no index error. What is the observed altitude of the planet?
Solution
- There is no index error to apply.
- An elevation correction of -3.8′ must be applied. The apparent altitude is therefore 61° 11.2′.
- The correction applicable to planets is -0.5′. This gives 61° 10.7′.
- A specific correction must be applied for the planet Mars. This can be found on page 222 of the Almanac: 0.1′. Thus, the observed altitude is 61° 10.8′.
Conclusion
Once you have understood the logic behind measurement errors, applying the corrections is simply a matter of a few additions and subtractions. The fundamental idea is not to overlook any of them, nor to make a calculation error by forgetting the direction of the correction.
Although formulas exist for certain corrections, others necessarily require the use of tables to find the corrections. For this reason, I prefer to rely solely on the tables to make the corrections, but this is, of course, a matter of preference.
If you always work with the same sextant and from the same spot on your boat, the corrections for the azimuth and elevation are constant. In this case, it is good practice to combine them into a single value to save time.
In the case of the sun and the moon, it is also good practice to always sight the same part of the celestial body. Personally, I find it easier to always sight the lower part. By doing so, you develop the reflex to always perform the same calculations by looking at the same sections of the tables. You reduce the chances of errors by making different corrections.
The next two articles focus on the calculations required to convert a sextant reading into a position line. The next article explains the technique for identifying the GP of a celestial body. The following article explains the technique for finding the position line associated with the observed altitude.
Did you enjoy this article? You can read more in the Learn section of this site.


3 Responses
[…] determine the latitude, you must first apply the appropriate altitude corrections to the Sun’s altitude to obtain the observed altitude. Next, you must look up the Sun’s declination in the Almanac (at […]
[…] essential tools and documentsThe theory of AstronavigationHow to do and read sextant sightsCorrections to sextant sightsFinding the GP of a Celestial BodySpherical Triangles and Sight […]
[…] necessary to establish a reliable position. The tables below are used to make these corrections. A full text is dedicated to understanding these […]